完成作品
自己本身滿愛玩遊戲的,自己開始學JavaScript之後,主要都是在學如何開發網頁及如何使用JavaScript來操作網頁,透過路由來新增、讀取、更新、刪除資料庫資料…,但心裡一直想,JavaScript的運用很廣泛,不如自己來查資料看看如何來製作一款簡易的小遊戲,也來接觸不同層面的開發運用。 於似乎我找到MDN上的一個打磚塊教學,就決定先從這個小遊戲開始練習學習並記錄過程。
第一步:認識canvas canvas 說明 它看起來有點像 <img> 元素,其中的差異點在於 <canvas> 沒有 src 和 alt 屬性,<canvas> 只有 width 與 height 這兩個屬性,這兩個屬性皆為非必須、能透過 DOM屬性設定;若是沒有設定 width 和 height 屬性,畫布寬預設值為 300 pixels、高預設值為 150 pixels,我們也可以用 CSS 強制設定元素尺寸,但當渲染時,影像會縮放以符合元素的尺寸。
Note:如果繪圖結果看起來有些扭曲,可以改試著用<canvas>自身的width和height屬性而不要用CSS來設定寬高。
需要</canvas>結束標籤
<canvas>產生一個固定大小的繪圖畫布,這個畫布上有一或多個渲染環境(rendering context),我們可以用渲染環境來產生或操作顯示內容的渲染環境(rendering context)。
一開始canvas為空白,程式碼腳本需要先存取渲染環境,在上面繪圖,然後才會顯現影像。<canvas> 素有一個方法(method)叫getContext(),透過此方法可以取得渲染環境及其繪圖函數(function);getContext()輸入參數只有渲染環境類型一項 ,像本教學所討論的2D繪圖,就是輸入”2d”。
Canvas基礎 我們將<canvas>元件的參考存成變數canvas為了未來使用。建立ctx變數儲存”2D渲染環境”,ctx變數實際拿來繪製Canvas的工具。
1
2
const canvas = document .querySelector('#myCanvas' ) const ctx = canvas.getContext('2d' )
先在canvas上印出紅色正方形。
1 2 3 4 5 6 7 8 ctx.beginPath() ctx.rect(20 , 40 , 50 , 50 ) ctx.fillStyle = "#FF0000" ctx.fill() ctx.closePath()
不止矩形,也可以印出綠色的圓形。
1
2
3
4
5
ctx.beginPath(); ctx.arc(240 , 160 , 20 , 0 , Math .PI*2 , false ); ctx.fillStyle = "green" ; ctx.fill(); ctx.closePath();
arc用到六個參數
圓弧中心的x、y座標
圓弧的半徑
圓弧開始和結束的角度(從開始到結束的角度, 以弧度表示)
繪製的方向(false代表順時針方向, 預設或true為逆時針方向) 最後一個參數並非必要
fillStyle 也可以像CSS一樣可以用16進位、顏色關鍵字、rgba()函式等其他可用的顏色指定方法。
不但有fill() 填滿圖形,還有 stroke() 專門為外輪廓線上色
1
2
3
4
5
ctx.beginPath(); ctx.rect(160 , 10 , 100 , 40 ); ctx.strokeStyle = "rgba(0, 0, 255, 0.5)" ; ctx.stroke(); ctx.closePath();
第二步:讓球移動 定義一個繪製用的迴圈 藉由繪製球在螢幕上然後再清除,然後在每個影格中繪製球在偏移一點點的位置上(如果在同一個位置上就等於沒動),造成物體移動的感覺,就如同電影中物體移動的方式。
為了固定更新 canvas 繪圖區域的每一個影格,我們需要定義一個繪製函式(drawing function),它將會重複執行,用不同的變數改變球的位置或其他物的位置。
畫一個圓,draw()函數每十毫秒會被setInterval執行一次:
1
2
3
4
5
6
7
8
function draw ( ctx.beginPath(); ctx.arc(50 , 50 , 10 , 0 , Math .PI*2 ); ctx.fillStyle = "#0095DD" ; ctx.fill(); ctx.closePath(); } setInterval (draw, 10 );
setInterval 會無限循環, draw() 函數會以每 10 毫秒被呼叫一次除非我們將它停止。
讓球動起來 目前球沒移動,因為它不斷在原本位置更新,所以看不出來。
1
2
3
4
let x = canvas.width / 2 ; let y = canvas.height - 30 ; const dx = 2 ; const dy = -2 ;
然後修改原本球的起始位置,然後再最後加上 x += dx , y += dy
1
2
3
4
5
6
7
8
9
10
function draw ( ctx.beginPath() ctx.arc(x, y, 10 , 0 , Math .PI*2 ) ctx.fillStyle = "#0095DD" ctx.fill() ctx.closePath() x += dx y += dy } setInterval (draw, 10 )
執行後球變成像畫線似的
在每個影格開始前清除canvas 要將canvas 清除掉可以使用 clearRect().
前兩個參數代表了長方形左上角的 x和 y座標
後兩個參數代表了長方形右下角的 x 和 y 座標
之前在這長方形範圍內所繪製的東西將會被清除掉。
1
2
3
4
5
6
7
8
9
10
11
function draw ( ctx.clearRect(0 , 0 , canvas.width, canvas.height) ctx.beginPath() ctx.arc(x, y, 10 , 0 , Math .PI*2 ) ctx.fillStyle = "#0095DD" ctx.fill() ctx.closePath() x += dx y += dy } setInterval (draw, 10 )
球沒有留下痕跡了。每 10 毫秒 canvas 會被清除,新的球將會被畫在指定的新位置上,且 x 和 y 會更新以用在下一個影格.
整理程式碼 把畫球獨立設為一個函式,因為這個函式會不斷地被使用。
1
2
3
4
5
6
7
8
9
10
11
12
13
14
15
16
17
18
19
20
21
22
23
const canvas = document .querySelector('#myCanvas' ) const ctx = canvas.getContext('2d' ) let x = canvas.width / 2 ; let y = canvas.height - 30 ; const dx = 2 ; const dy = -2 ; function drawBall ( ctx.beginPath() ctx.arc(x, y, 10 , 0 , Math .PI * 2 ) ctx.fillStyle = "#0095DD" ctx.fill() ctx.closePath() } function draw ( ctx.clearRect(0 , 0 , canvas.width, canvas.height) drawBall() x += dx y += dy } setInterval (draw, 10 )
第三步:讓球反彈吧! 簡單的碰撞偵測 為了偵測碰撞的發生,我們將檢查球是否接觸(相撞)牆壁,如果有碰到,我們就改變球的行進方向。
總共有四面牆壁會與球發生碰撞,先處理上方的牆壁:
1
2
3
if (y + dy < 0 ) { dy = -dy; }
單純看垂直Y軸移動方向,因為向上是負數,最上方為0,如果球位置的Y值低於零,就改變Y軸的運動的方向,可以再次宣告它本身來轉換。
1
2
3
if (y + dy > canvas.height) { dy = -dy; }
兩語句可以合併
1
2
3
if (y + dy > canvas.height || y + dy < 0 ) { dy = -dy; }
依此類推X軸就是
1
2
3
if (x + dx > canvas.width || x + dx < 0 ) { dx = -dx; }
加入draw()裡面
1
2
3
4
5
6
7
8
9
10
11
12
function draw ( ctx.clearRect(0 , 0 , canvas.width, canvas.height) if (x + dx > canvas.width || x + dx < 0 ) { dx = -dx; } if (y + dy > canvas.height || y + dy < 0 ) { dy = -dy; } drawBall() x += dx y += dy }
這時候球就會反彈啦! ,但是會發現求超出畫面半顆,因為是以球心做為判斷,這時候要在邊界上扣掉和增加球的半徑
1
2
3
4
5
6
7
8
9
10
11
12
function draw ( ctx.clearRect(0 , 0 , canvas.width, canvas.height) if (x + dx > canvas.width - ballRadius || x + dx < 0 + ballRadius) { dx = -dx; } if (y + dy > canvas.height - ballRadius || y + dy < 0 + ballRadius) { dy = -dy; } drawBall() x += dx y += dy }
第四步:控制球版 目前還無法跟畫面互動,如果沒有互動,怎麼稱作遊戲!
畫球拍 所以我們這時需要一個球拍,先定義一些變數,定義球拍的長和寬,和球拍X軸上的初始位置
1
2
3
const paddleHeight = 10 ;const paddleWidth = 75 ;let paddleX = (canvas.width-paddleWidth)/2 ;
接著把球拍畫出來
1
2
3
4
5
6
7
function drawPaddle ( ctx.beginPath() ctx.rect(paddleX, canvas.height-paddleHeight, paddleWidth, paddleHeight); ctx.fillStyle = "#0095DD" ctx.fill() ctx.closePath() }
允許用戶控制球版 我們需要:
可以使用 boolean 變量來初始定義。
1
2
let rightPressed = false let leftPressed = false
這兩個變量的兩個默認值都是false,因為在開始時沒有任何案件被按下。
1
2
document .addEventListener("keydown" , keyDownHandler) document .addEventListener("keyup" , keyUpHandler)
並新增keyDownHandler及keyUpHandler兩個函式
1
2
3
4
5
6
7
8
9
10
11
12
13
14
15
16
17
18
19
function keyDownHandler (e ) if (e.keyCode == 39 ) { rightPressed = true } else if (e.keyCode == 37 ) { leftPressed = true } } function keyUpHandler (e ) if (e.keyCode == 39 ) { rightPressed = false } else if (e.keyCode == 37 ) { leftPressed = false } }
總而言之,不管按下或放開,都要監聽,監聽後還要判斷按下或放開哪一顆鍵,都要設定。
球版控制邏輯 現在有用於存儲按鍵,事件監聽器和相關功能的信息的變量。
1
2
3
4
5
6
if (rightPressed) { paddleX += 7 ; } else if (leftPressed) { paddleX -= 7 ; }
如果按一下左鍵,球拍將向左移動7個像素,如果按一下右鍵,球拍將向右移動7個像素。
1
2
3
4
5
6
if (rightPressed && paddleX < canvas.width - paddleWidth) { paddleX += 7 ; } else if (leftPressed && paddleX > 0 ) { paddleX -= 7 ; }
第五步:Game Over,及接球 Game Over 目前遊戲永無止盡,所以要修改一下牆壁反彈的規則,當球從下方離開畫布時,就跳出警示,並重新開始遊戲。
1
2
3
4
5
6
7
8
9
10
11
12
13
14
15
16
17
18
19
20
21
22
function draw ( ctx.clearRect(0 , 0 , canvas.width, canvas.height) if (x + dx > canvas.width - ballRadius || x + dx < 0 + ballRadius) { dx = -dx; } if ( y + dy < 0 + ballRadius ) { dy = -dy; } else if ( y + dy > canvas.height - ballRadius ) { alert('Game Over' ) document .location.reload() } if (rightPressed && paddleX < canvas.width - paddleWidth) { paddleX += 7 ; } else if (leftPressed && paddleX > 0 ) { paddleX -= 7 ; } drawBall() drawPaddle() x += dx y += dy }
接球 最後球和球拍之間要創建一些碰撞檢測,使它可以反彈並返回到遊戲區域。
1
2
3
4
5
6
7
8
9
10
11
12
13
14
15
16
17
18
19
20
21
22
23
24
25
26
27
28
29
30
31
function draw ( ctx.clearRect(0 , 0 , canvas.width, canvas.height) if (x + dx > canvas.width - ballRadius || x + dx < 0 + ballRadius) { dx = -dx; } if ( y + dy < 0 + ballRadius ) { dy = -dy; } else if ( y + dy > canvas.height - ballRadius ) { if ( x > paddleX && x < paddleX + paddleWidth) { dy = -dy } else { alert('Game Over' ) document .location.reload() } } if (rightPressed && paddleX < canvas.width - paddleWidth) { paddleX += 7 ; } else if (leftPressed && paddleX > 0 ) { paddleX -= 7 ; } drawBall() drawPaddle() x += dx y += dy }
第六步:畫磚 (重要!) 只有彈接球有點無聊,加上磚來增添遊戲趣味。
1
2
3
4
5
6
7
let brickRowCount = 3 let brickColumnCount = 5 const brickWidth = 75 const brickHeight = 20 const brickPadding = 10 const brickOffsetTop = 30 const brickOffsetLeft = 30
定義了磚的行數和列,寬度和高度,磚塊之間的距離,這樣它們就不會互相接觸;有一個上、左偏移量,就不會從畫布的邊緣開始繪製。
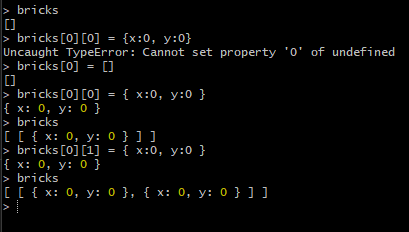
畫磚的邏輯 我們將在一個二維數組容納我們所有的磚。
1
2
3
4
5
6
7
let bricks = [];for (c=0 ; c<brickColumnCount; c++) { bricks[c] = []; for (r=0 ; r<brickRowCount; r++) { bricks[c][r] = { x : 0 , y : 0 }; } }
bricks是一個雙層陣列,陣列裡還有數組表示Column的陣列,,Column的陣列裡面有數組物件,代表Row,
C0
C1
C2
C3
C4
R0
x,y
x,y
x,y
x,y
x,y
R1
x,y
x,y
x,y
x,y
x,y
R2
x,y
x,y
x,y
x,y
x,y
接著我們創建一個函數來遍歷數組中的所有磚塊並在屏幕上繪製它們。
1
2
3
4
5
6
7
8
9
10
11
12
13
function drawBricks ( for (c=0 ; c<brickColumnCount; c++) { for (r=0 ; r<brickRowCount; r++) { bricks[c][r].x = 0 ; bricks[c][r].y = 0 ; ctx.beginPath(); ctx.rect(0 , 0 , brickWidth, brickHeight); ctx.fillStyle = "#0095DD" ; ctx.fill(); ctx.closePath(); } } }
現在會將所有的磚畫出可是它只會畫在同個位置上,所以要加上一些變數,來改變磚的x和y
1
2
let brickX = (c*(brickWidth+brickPadding))+brickOffsetLeftlet brickY = (r*(brickHeight+brickPadding))+brickOffsetTop
每個brickX位置是 brickWidth + brickPadding,乘以列數C,再加上brickOffsetLeft;
現在把變數套進函式內,
1
2
3
4
5
6
7
8
9
10
11
12
13
14
15
function drawBricks ( for (c=0 ; c<brickColumnCount; c++) { for (r=0 ; r<brickRowCount; r++) { let brickX = (c*(brickWidth+brickPadding))+brickOffsetLeft let brickY = (r*(brickHeight+brickPadding))+brickOffsetTop bricks[c][r].x = brickX bricks[c][r].y = brickY ctx.beginPath() ctx.rect(brickX, brickY, brickWidth, brickHeight) ctx.fillStyle = "#0095DD" ctx.fill() ctx.closePath() } } }
這樣每一塊磚就會被畫在正確的位置上,每一塊磚之間也都有間隔,且是從左上角和頂部的畫布邊緣偏移。
第七步:打破磚 邏輯是必須在每塊磚一開始給個Key跟Value,添加一個物件KEY表示狀態,值則是讓磚塊有被打破,及沒被打破兩種值,可以用0,1處裡,接著當球如果通過磚要達成以下條件:
球的 X 位置大於磚的 X 位置。
球的 X 位置小於磚的 X 位置加上它的寬度。
球的 Y 位置大於磚的Y位置。
球的 Y 位置小於磚塊的 Y 位置加上它的高度。
所以
先添加屬性 1 2 3 4 5 6 7 let bricks = [];for (c = 0 ; c < brickColumnCount; c++) { bricks[c] = []; for (r = 0 ; r < brickRowCount; r++) { bricks[c][r] = { x : 0 , y : 0 , status : 1 }; } }
接著畫磚函示加上判斷
1 2 3 4 5 6 7 8 9 10 11 12 13 14 15 16 17 function drawBricks ( for (c = 0 ; c < brickColumnCount; c++) { for (r = 0 ; r < brickRowCount; r++) { if (bricks[c][r].status === 1 ) { let brickX = (c * (brickWidth + brickPadding)) + brickOffsetLeft let brickY = (r * (brickHeight + brickPadding)) + brickOffsetTop bricks[c][r].x = brickX bricks[c][r].y = brickY ctx.beginPath() ctx.rect(brickX, brickY, brickWidth, brickHeight) ctx.fillStyle = "#0095DD" ctx.fill() ctx.closePath() } } } }
最後補上判斷磚塊是否被打擊函式,邏輯:當磚球都被繪製出位置之後,遍歷所有的磚塊,檢查是否有被擊中,若有就將Y方向反轉,並將磚塊的狀態設定成0。
1 2 3 4 5 6 7 8 9 10 11 function collisionDetection ( for (c=0 ; c<brickColumnCount; c++) { for (r=0 ; r<brickRowCount; r++) { var b = bricks[c][r] if (x > b.x && x < b.x+brickWidth && y > b.y && y < b.y+brickHeight) { dy = -dy b.status = 0 } } } }
最後在draw()中調用函式,切記要在drawBall及drawBrick之後。
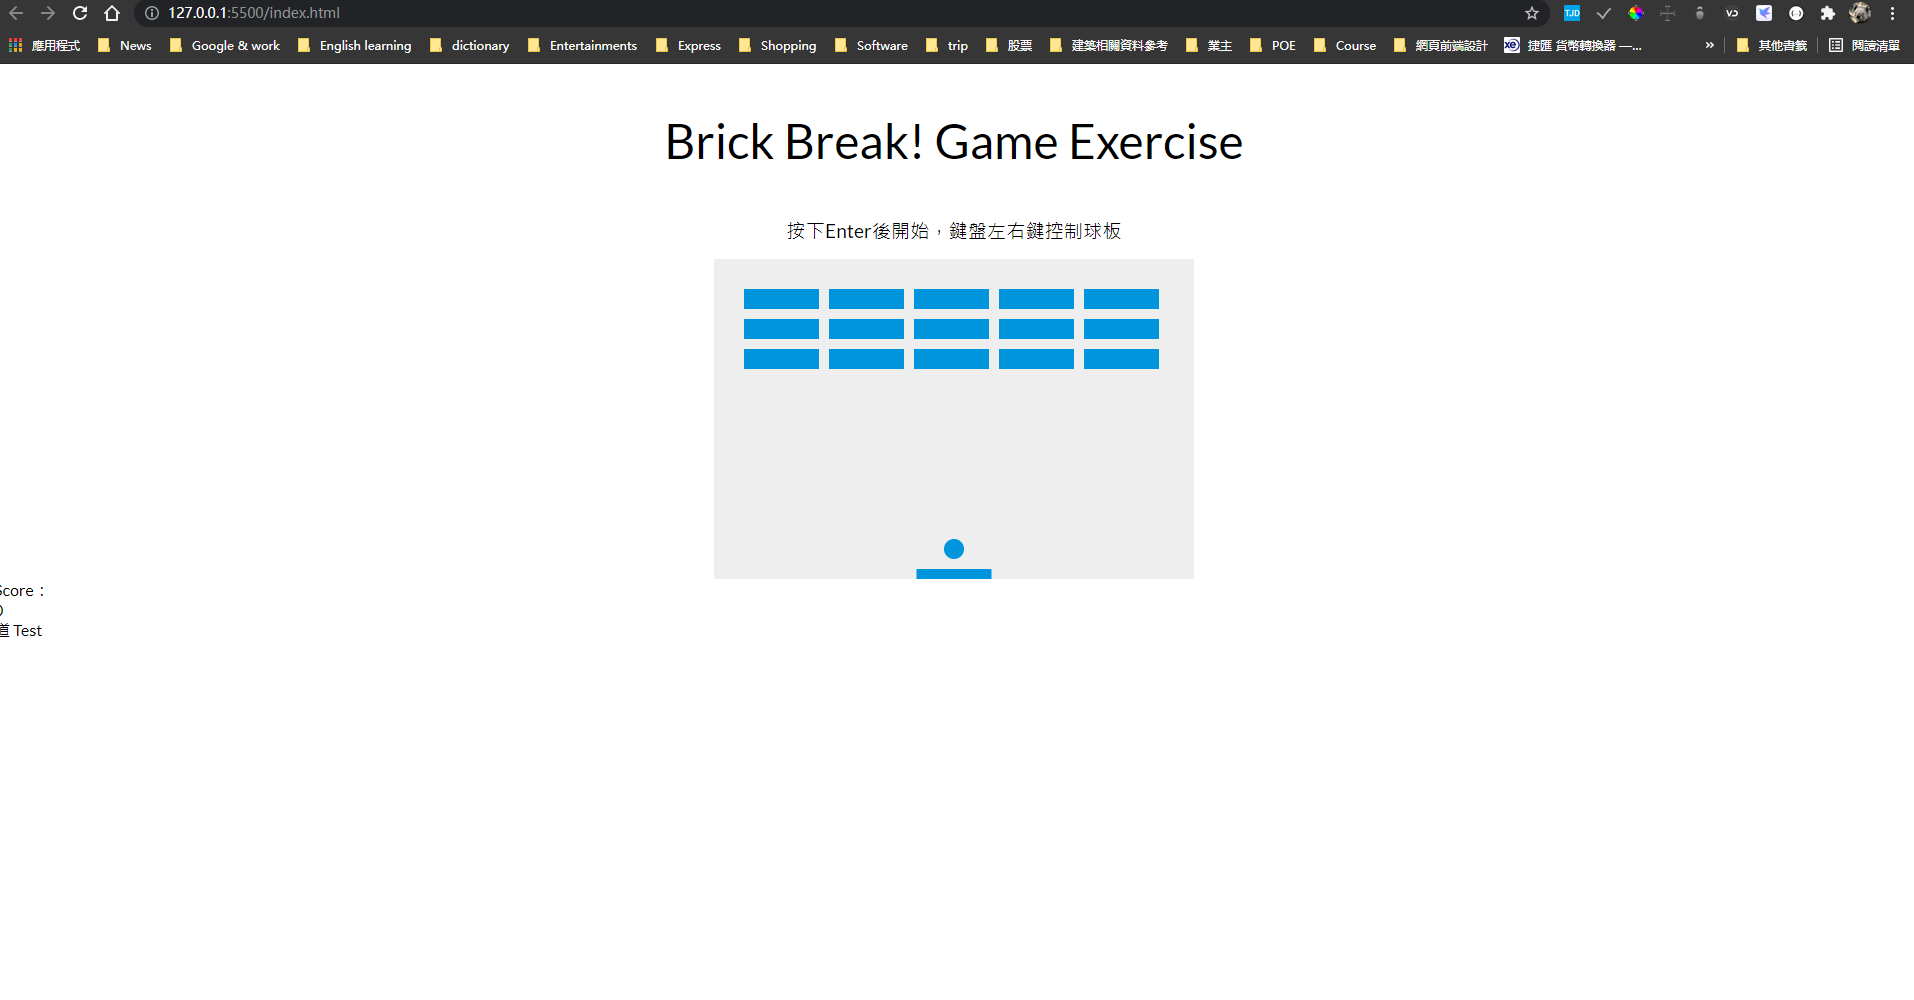
第八步:計算分數及獲勝 邏輯:存一個變數計算分數,然後在磚塊碰撞檢測函數增加,分數增加,然後設定一個獲勝判斷函式,當分數達到多少分時贏得勝利。
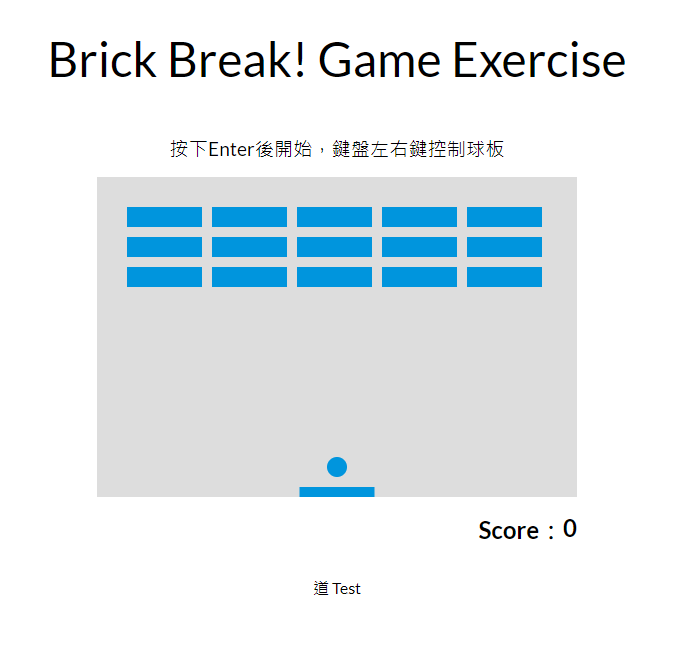
目前畫面,先來設定記分板的位置
完成畫面
1 2 3 4 5 6 7 8 9 10 11 12 13 14 15 16 17 let score = 0 function collisionDetection ( for (c = 0 ; c < brickColumnCount; c++) { for (r = 0 ; r < brickRowCount; r++) { let b = bricks[c][r] if (b.status == 1 ) { if (x > b.x && x < b.x + brickWidth && y > b.y && y < b.y + brickHeight) { dy = -dy; b.status = 0 ; score += 10 ; showScore.innerText = score } } } } }
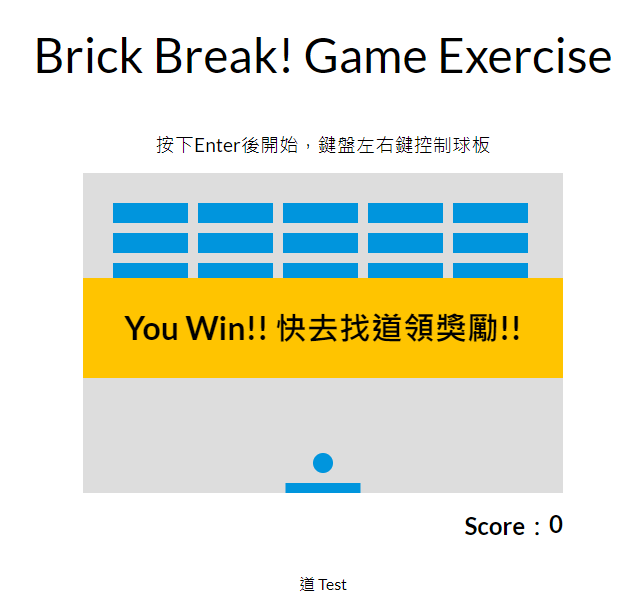
設定好獲勝時的勝利畫面
JS加入獲勝判斷函式
1 2 3 4 5 6 7 8 function detectionWin ( if (score === bricks.length * bricks[0 ].length * 10 && score !== 0 ) { winText.style.display = "block" ; return } }
第九步:滑鼠監測 只需要利用滑鼠移動監聽器
1 document .addEventListener("mousemove" , mouseMoveHandler);
然後加上mosuMoveHandler函式
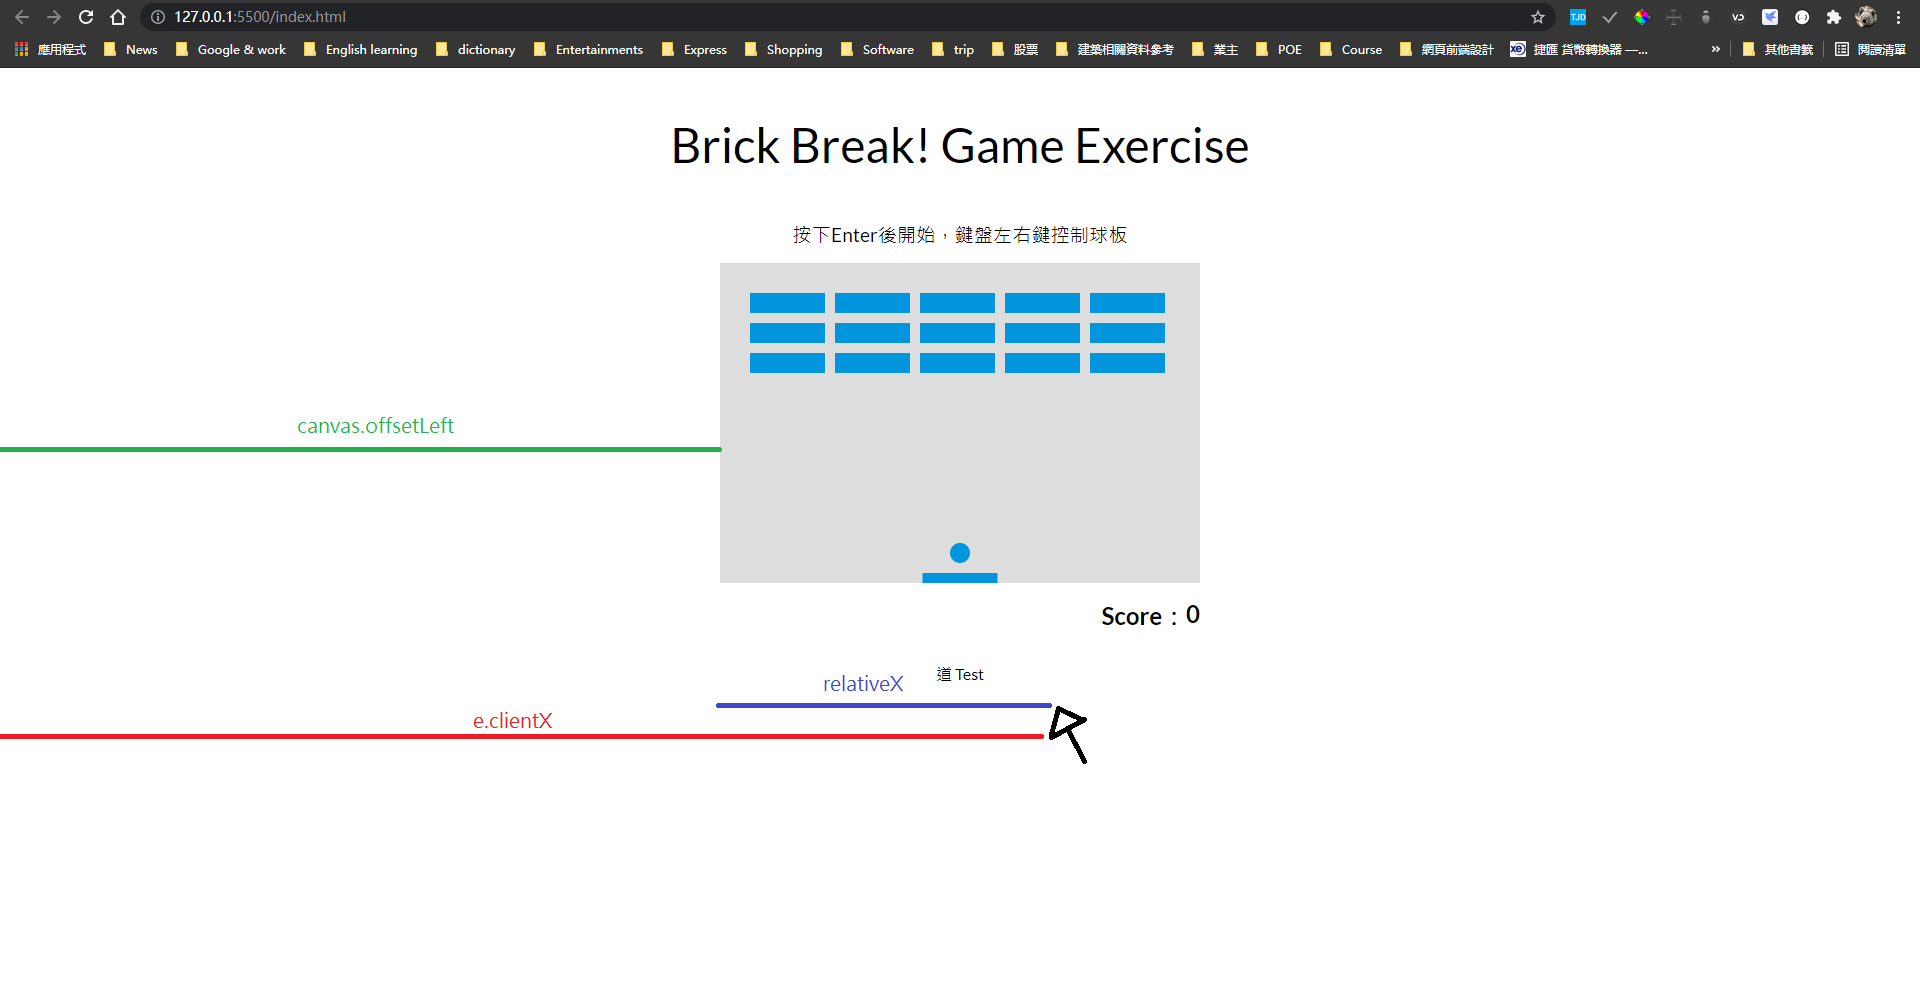
1 2 3 4 5 6 function mouseMoveHandler (e ) let relativeX = e.clientX - canvas.offsetLeft if (relativeX > 0 && relativeX < canvas.width) { paddleX = relativeX - paddleWidth/2 } }
在這個函數中,我們首先計算 relativeX 的值,它等於鼠標在視窗中的水平位置 (e.clientX) 減去 canvas 元素左邊框到視窗左邊框的距離 (canvas.offsetLeft) —— 這就得到了 canvas 元素左邊框到鼠標的距離。若這個值大於零,且小於 canvas 的寬度,說明鼠標指針落在 canvas 邊界內,這時就把 paddleX (等於球板左邊緣的坐標)設為 relativeX 減去球板寬度的一半。這樣就確保位移是相對於球板中心進行的。
第十步:部分優化
隨機開始發球的方向
增加勝利畫面
增加輸畫面
增加生命次數
增加出界線
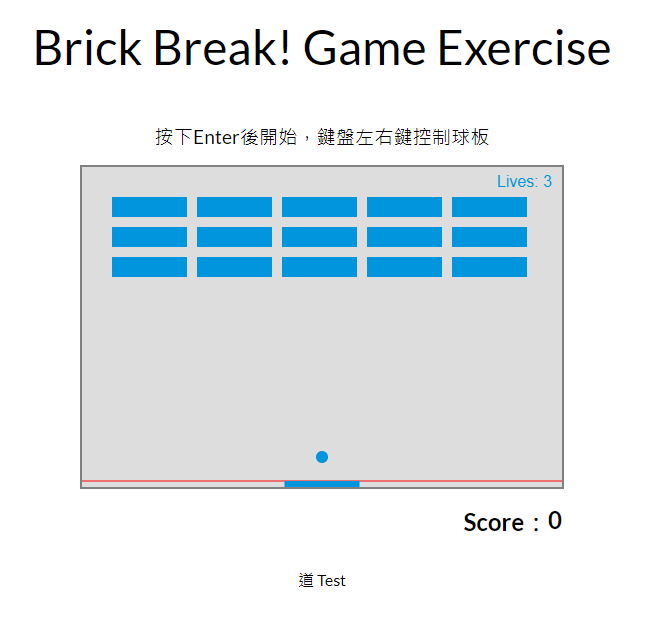
完成畫面
setInterval改為requestAnimationFrame進行優化渲染
將原本的setInterval改為新版的requestAnimationFrame進行優化渲染
首先先在頁頭宣告一個變數
再來將原本任何關於Interval的部分全部刪除,包含停止渲染clearInterval都要刪除,這時候不管輸贏都不會停止了
再來說說requestAnimationFrame的使用方式render 變數
1 2 3 4 5 6 7 8 9 10 11 12 13 14 15 16 17 18 19 20 21 22 23 24 25 26 27 function draw ( ctx.clearRect(0 , 0 , canvas.width, canvas.height) detectionWin() if (x + dx > canvas.width - ballRadius || x + dx < 0 + ballRadius) { dx = -dx; } if (y + dy < 0 + ballRadius) { dy = -dy; } else if (y + dy > canvas.height - ballRadius * 2 ) { if (x > paddleX && x < paddleX + paddleWidth) { dy = -dy } else { if (!lives) { clearInterval (interval) loseText.style.display = "block" } else { lives-- x = canvas.width / 2 ; y = canvas.height - 30 ; dx = 5 * (Math .round(Math .random()) * 2 - 1 ) dy = Math .ceil(Math .random() * -3 ) - 2 paddleX = (canvas.width - paddleWidth) / 2 } } render = requestAnimationFrame(draw) }
接著來修改監聽Enter的函式keyDownHandler()
1 2 3 4 5 6 7 8 9 10 11 12 13 14 15 16 17 18 function keyDownHandler (e ) if (e.key === "Enter" ) { if (!render) { draw() } else { initial() draw() loseText.style.display = "none" winText.style.display = "none" } } if (e.keyCode == 39 ) { rightPressed = true } else if (e.keyCode == 37 ) { leftPressed = true } }
所以目前遊戲的邏輯是
遊戲初始畫畫面(停止)
render = null
按下Enter後呼叫draw(),並且draw() 會 render = requestAnimationFrame(draw)
等待輸贏
接著就是要等待輸贏,不管贏或輸都要停止渲染,這邊接著說明 requestAnimationFrame() 停止的使用方式
requestAnimationFrame()的停止方式為 cancelAnimationFrame() 但要使用用cancelAnimationFrame()這個函式來停止requestAnimationFrame()有一個條件,就是 requestAnimationFrame() 當初有給他一個變數名稱
1 cancelAnimationFrame(render)
並將他放判斷輸贏的部分,一旦取消後,要再次將 render = null
1 2 3 4 5 6 7 8 9 10 11 12 13 14 15 16 17 18 19 20 21 22 23 24 25 26 27 28 29 30 31 32 33 34 35 36 37 38 39 40 41 42 43 44 45 46 47 48 49 50 51 52 53 function detectionWin ( if (score === bricks.length * bricks[0 ].length * 10 && score !== 0 ) { cancelAnimationFrame(render) render = null winText.style.display = "block" ; } } function draw ( ctx.clearRect(0 , 0 , canvas.width, canvas.height) detectionWin() if (x + dx > canvas.width - ballRadius || x + dx < 0 + ballRadius) { dx = -dx; } if (y + dy < 0 + ballRadius) { dy = -dy; } else if (y + dy > canvas.height - ballRadius * 2 ) { if (x > paddleX && x < paddleX + paddleWidth) { dy = -dy } else { if (!lives) { cancelAnimationFrame(render) render = null loseText.style.display = "block" } else { lives-- x = canvas.width / 2 ; y = canvas.height - 30 ; dx = 5 * (Math .round(Math .random()) * 2 - 1 ) dy = Math .ceil(Math .random() * -3 ) - 2 paddleX = (canvas.width - paddleWidth) / 2 } } } if (rightPressed && paddleX < canvas.width - paddleWidth) { paddleX += 7 } else if (leftPressed && paddleX > 0 ) { paddleX -= 7 } drawBoundary() drawLives() drawBricks() drawBall() drawPaddle() collisionDetection() x += dx y += dy }
都設定完畢了,但是發現為什麼畫面還是沒有停止渲染!?!?!?
1 2 3 4 5 6 7 8 9 10 11 12 13 14 15 16 17 18 19 20 21 22 23 24 25 26 27 28 29 30 31 32 33 34 35 36 37 38 39 40 41 42 43 44 45 46 47 48 49 50 51 function detectionWin ( if (score === bricks.length * bricks[0 ].length * 10 && score !== 0 ) { cancelAnimationFrame(render) render = null winText.style.display = "block" ; } } function draw ( ctx.clearRect(0 , 0 , canvas.width, canvas.height) detectionWin() if (x + dx > canvas.width - ballRadius || x + dx < 0 + ballRadius) { dx = -dx; } if (y + dy < 0 + ballRadius) { dy = -dy; } else if (y + dy > canvas.height - ballRadius * 2 ) { if (x > paddleX && x < paddleX + paddleWidth) { dy = -dy } else { if (!lives) { cancelAnimationFrame(render) render = null loseText.style.display = "block" } else { lives-- x = canvas.width / 2 ; y = canvas.height - 30 ; dx = 5 * (Math .round(Math .random()) * 2 - 1 ) dy = Math .ceil(Math .random() * -3 ) - 2 paddleX = (canvas.width - paddleWidth) / 2 } } } if (rightPressed && paddleX < canvas.width - paddleWidth) { paddleX += 7 } else if (leftPressed && paddleX > 0 ) { paddleX -= 7 } drawBoundary() drawLives() drawBricks() drawBall() drawPaddle() collisionDetection() x += dx y += dy }
原因出在,當我draw()調用detectionWin()後並沒有return,所以程式又繼續執行下去了!!
1 2 3 4 5 6 7 8 9 10 11 12 13 14 15 16 17 18 19 20 21 22 23 24 25 26 27 28 29 30 31 32 33 34 35 36 37 38 39 40 41 42 43 44 45 46 47 48 49 50 51 52 53 54 55 function detectionWin ( if (score === bricks.length * bricks[0 ].length * 10 && score !== 0 ) { winText.style.display = "block" ; return true } } function draw ( ctx.clearRect(0 , 0 , canvas.width, canvas.height) if (detectionWin()) { cancelAnimationFrame(render) render = null return } if (x + dx > canvas.width - ballRadius || x + dx < 0 + ballRadius) { dx = -dx; } if (y + dy < 0 + ballRadius) { dy = -dy; } else if (y + dy > canvas.height - ballRadius * 2 ) { if (x > paddleX && x < paddleX + paddleWidth) { dy = -dy } else { if (!lives) { cancelAnimationFrame(render) render = null loseText.style.display = "block" } else { lives-- x = canvas.width / 2 ; y = canvas.height - 30 ; dx = 5 * (Math .round(Math .random()) * 2 - 1 ) dy = Math .ceil(Math .random() * -3 ) - 2 paddleX = (canvas.width - paddleWidth) / 2 } } } if (rightPressed && paddleX < canvas.width - paddleWidth) { paddleX += 7 } else if (leftPressed && paddleX > 0 ) { paddleX -= 7 } drawBoundary() drawLives() drawBricks() drawBall() drawPaddle() collisionDetection() x += dx y += dy }
大功告成!!